
Let me guess. You’ve measured your bay window, stood there squinting at it, and thought: “Why is nothing ever straightforward?” You’re not alone. Bay windows are gorgeous — all that light, all that character — but dressing them? That’s where most people quietly lose their minds.
I’ve spoken to enough homeowners (and read enough frustrated forum threads) to know the bay window curtain rail situation is genuinely confusing. Flexible tracks, modular poles, ceiling fix, wall fix… it’s a rabbit hole. So let’s settle it once and for all.
Whether you’re in a classic Victorian terrace in London, an Edwardian semi in Manchester, or a 70s box-bay in Edinburgh, this guide will tell you exactly what to buy, how to fit it, and — crucially — how to avoid wasting £80 on the wrong thing.

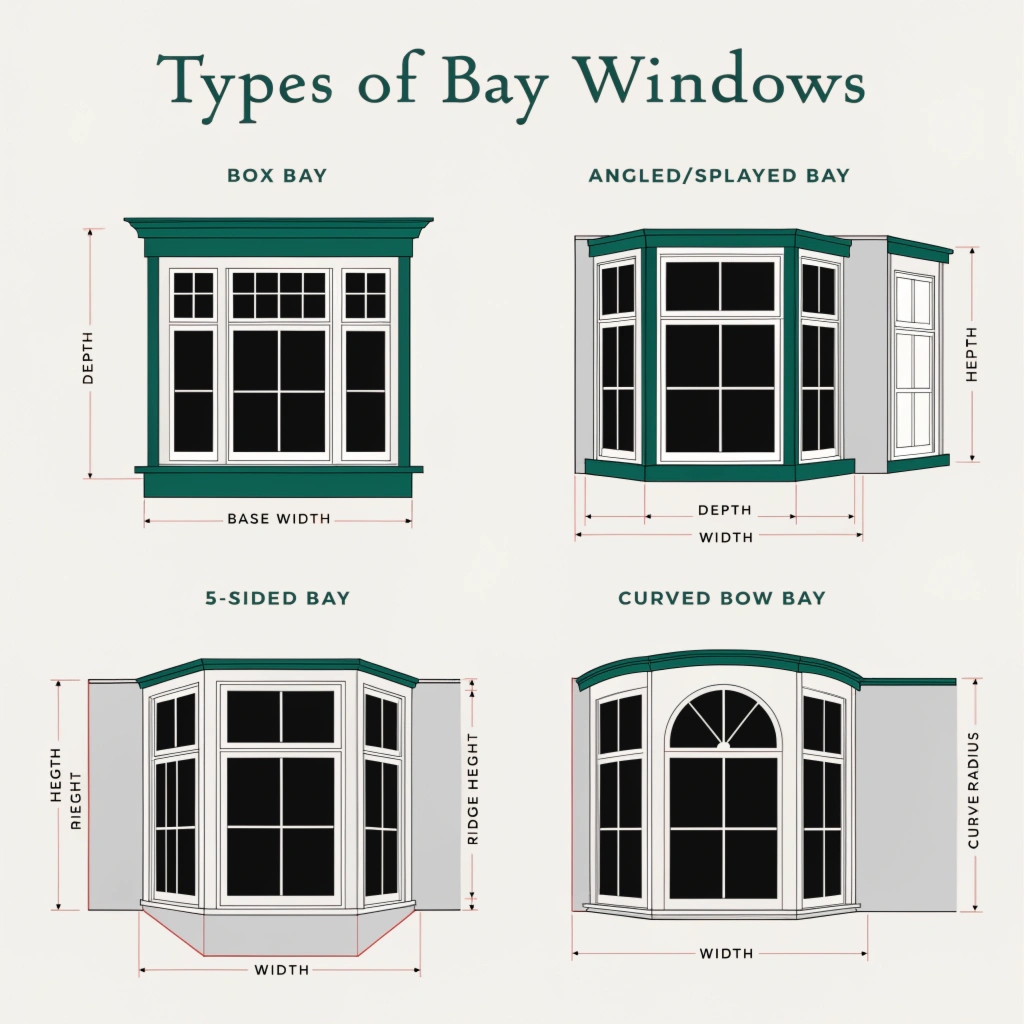
Not all bay windows are created equal, and the type of bay you have will directly determine which curtain rail you need. Get this wrong and your lovely new track simply won’t fit.
- Box bay window: Three flat sides, two sharp 90-degree corners. Very common in ex-council and 1960s–80s homes. Most budget-friendly tracks work well here.
- Angled/splayed bay (3-sided): The classic Victorian or Edwardian style. Two angled side panels and a large central window. The most popular type in London, Bath, and Glasgow.
- 5-sided bay: Five wall sections with a wider spread. Common in larger Edwardian properties. Needs a 5-sided pole kit or a generous made-to-measure track.
- Curved/bow bay: A continuous gentle curve — the trickiest of all. Requires a properly flexible bendable track or a custom made-to-measure solution. No standard pole kits here.
Once you know your bay shape, everything else becomes much easier.
Here’s the honest breakdown of every type of curtain rail for bay windows on the UK market right now, including what they cost, who they’re best for, and where to get them.
| Type | Bay Shape | Fixing | Price (GBP) | Best For | Watch Out |
|---|---|---|---|---|---|
|
Box, curved |
Wall or ceiling |
£20–£60 |
DIY-friendly, budget |
Can feel flimsy if cheap |
|
|
Angled 3 or 5-sided |
Wall |
£60–£150 |
Stylish, great for eyelet |
Needs more precise measuring |
|
|
Any shape |
Wall or ceiling |
£80–£300+ |
Perfect fit, pro finish |
Higher cost, longer lead time |
|
|
Any shape |
Wall or ceiling |
£150–£500+ |
Smart home compatible |
Expensive, needs power |
This is the most popular choice for UK DIYers, and for good reason. You buy a long flexible track (usually aluminium or reinforced PVC), bend it by hand to follow the shape of your bay, then fix the brackets to the wall or ceiling.
- Best for: Box bays, curved bays, anyone on a budget
- Price range: £20–£60
- Top tip: Aluminium tracks last far longer than plastic ones. If you’re fitting heavy lined curtains, always go aluminium.
Pro tip from the forum trenches: Some people soak plastic tracks in hot water to make them more pliable before bending. Works a treat — but if you’re going aluminium, just bend it slowly and steadily by hand in small sections.
These are the ones that come in a box with separate pole sections and corner connectors. You assemble them on-site to fit your specific bay angle. They look genuinely smart — much more like a ‘proper’ feature than a plain track.
- Best for: Angled 3-sided or 5-sided Victorian/Edwardian bays, eyelet curtains
- Price range: £60–£150
- Note: Eyelet curtains need a pole, not a track. This is the style to choose if you want that look.
If you want a truly professional result, a made-to-measure track is the way to go. You send your measurements, they bend the track in their workshop to your exact bay shape, and it arrives ready to fit.
- Best for: Unusual bay shapes, professional finish, heavy curtains, avoiding the DIY headache
- Price range: £80–£300+
Direct Fabrics (direct-fabrics.co.uk) and Ezecurtains (ezecurtains.co.uk) are two UK suppliers worth looking at for this. Customer reviews for both are consistently positive
If you’ve ever watched someone fumble around behind a sofa trying to pull a heavy curtain, you’ll understand the appeal. Electric tracks are increasingly popular in UK homes, particularly for large or hard-to-reach bay windows.
- Best for: Tech-forward homeowners, large bays, those with accessibility needs
- Price range: £150–£500+
- Many are now compatible with Amazon Alexa and Google Home

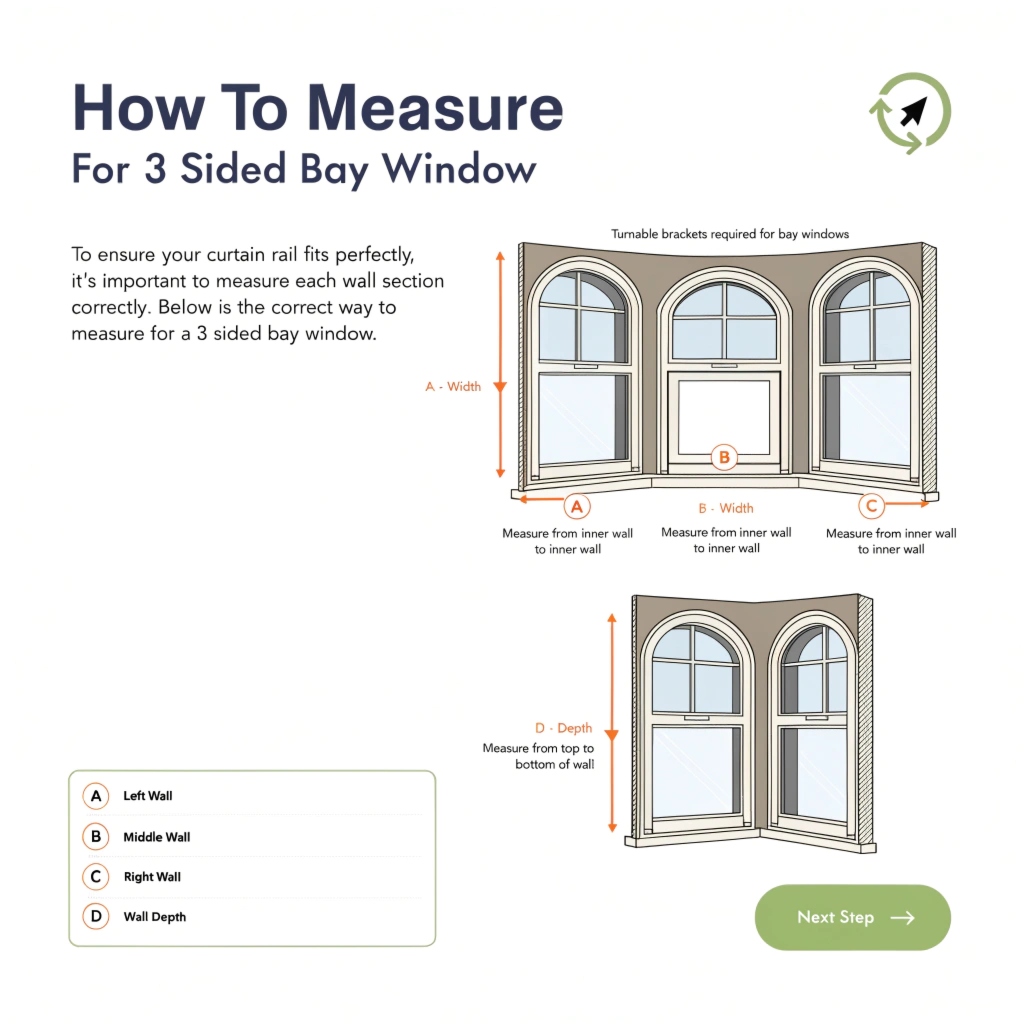
Here’s the single most common mistake people make: they measure across the front of the bay instead of around it. That gives you completely the wrong number. Here’s how to do it properly:
- Stand inside the bay and measure along each wall section individually — left side, centre, right side.
- Add these three measurements together to get your total track length.
- If you want your curtains to extend beyond the bay into the room (which lets in more light when open), add an extra 20–30cm to each end.
- Note the angle of each corner — most standard bay pole kits are designed for 135-degree angles, but yours may differ.
- Measure the height from where you want the track to sit (wall or ceiling) down to where you want the curtains to fall.
Rule of thumb: Always add a few extra centimetres when ordering. You can trim a track down; you can’t stretch it.
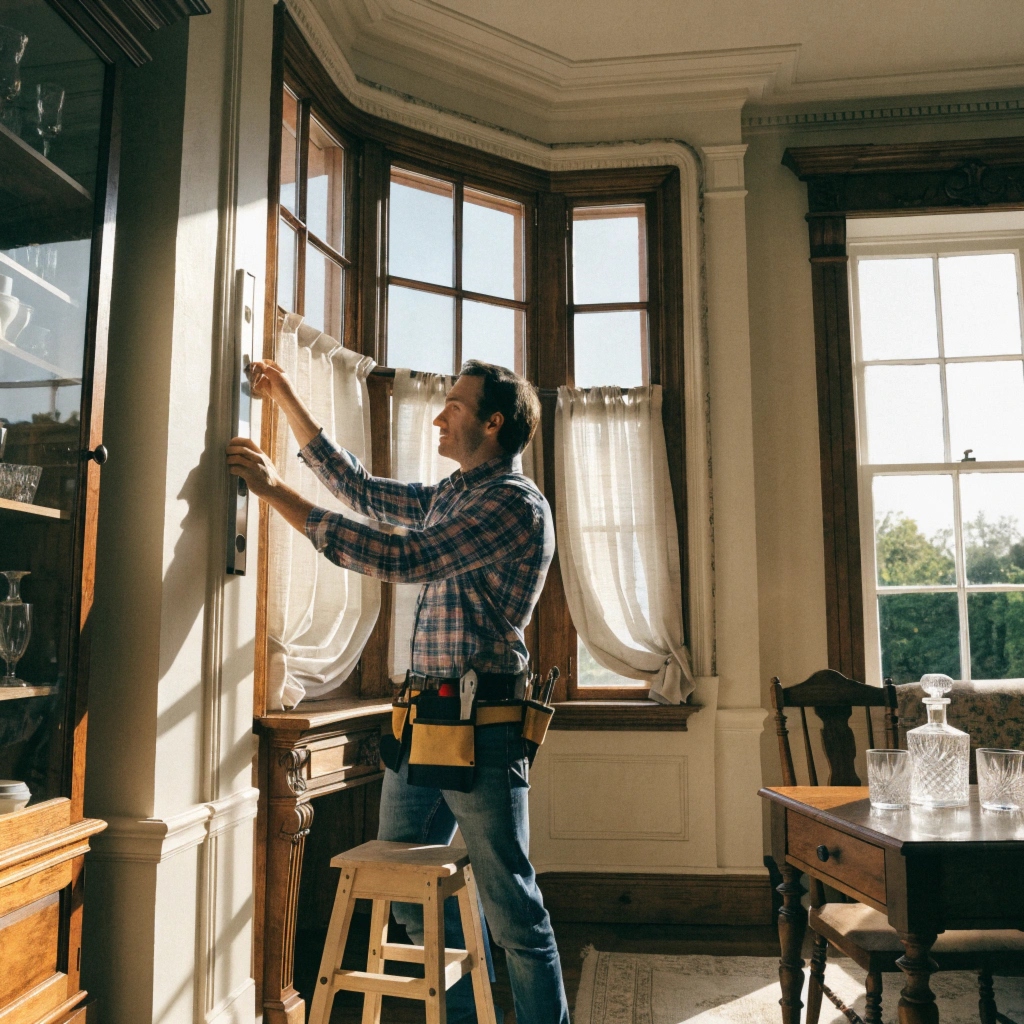
Right. Roll up your sleeves. Here’s how to put up a bay window curtain rail yourself, without losing your temper or your marriage.
What You’ll Need
- Flexible track or bay pole kit (sized to your measurements)
- Electric drill and suitable drill bits
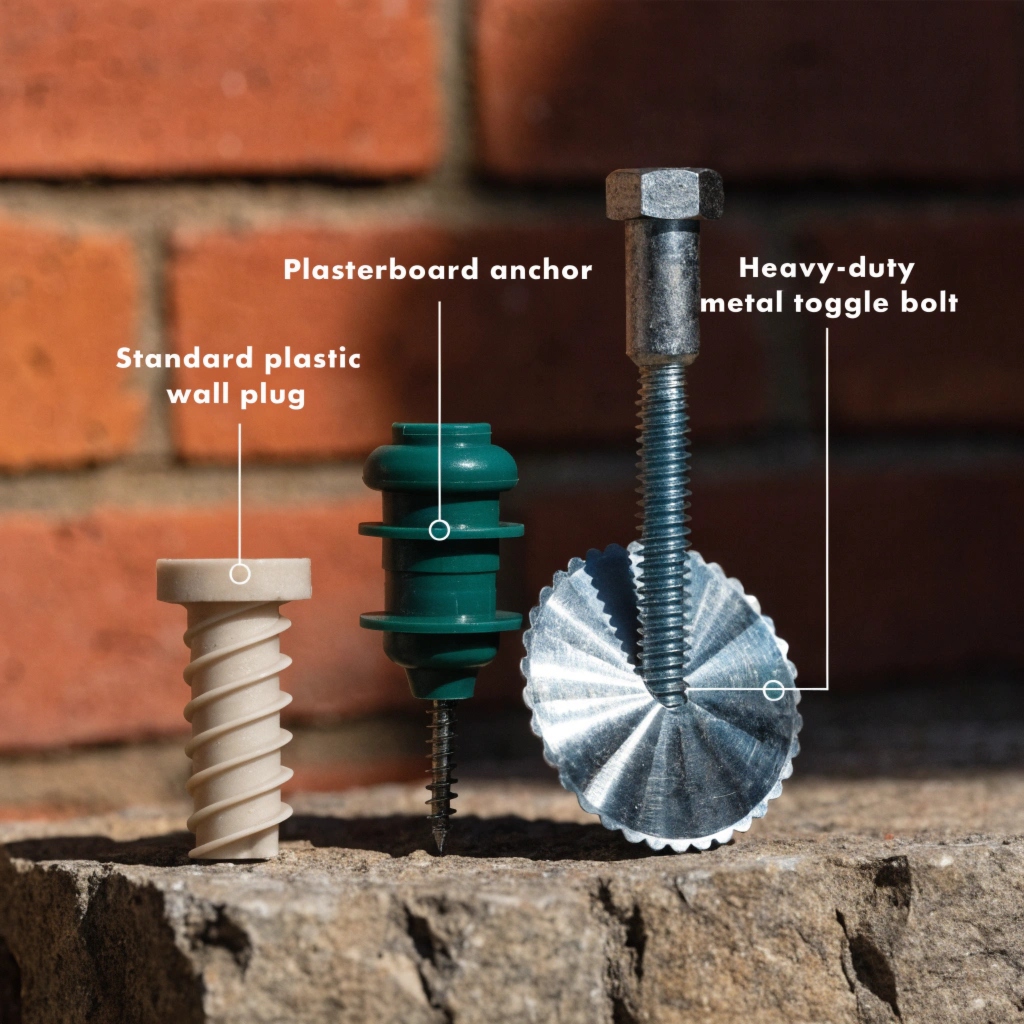
- Wall plugs (correct type for your wall — plasterboard needs specialist fixings)
- Spirit level
- Tape measure and pencil
- Screwdriver
- Step ladder
Step-by-Step Fitting Guide
- Bend your track (if flexible): Work slowly, bending a little at a time, following the shape of your bay wall. Don’t rush it — sharp bends can kink the track.
- Mark your bracket positions: Start at the ends, then space brackets every 25–30cm along the straight sections, and every 15–20cm on bends. More brackets = better support.
- Check your wall type: Solid brick (most Victorian/Edwardian homes)? Standard wall plugs. Plasterboard (many modern or refurbed homes)? Use plasterboard anchors — they grip much better than standard plugs.
- Drill and plug: Drill your holes, tap in your wall plugs. If you hit solid resistance early, you may have found a brick rather than a mortar joint — reposition slightly.
- Fix brackets and slide in the track: Most tracks simply click or slide into the brackets. Double-check it’s level with your spirit level before tightening everything fully.
- Hang your curtains and test: Run the curtains back and forth a few times. If anything catches, check for bent gliders or sections where the track hasn’t been properly aligned.
Ceiling fixing: If you’re going ceiling-fix (which looks brilliant and creates the illusion of height), leave a gap of at least 7cm from the wall to allow the curtains to clear the wall when drawn.
Real talk: The first time I did this, I fitted the brackets too close to the corner bends and the curtain kept catching. Spacing your brackets properly — especially on the curves — makes all the difference.
It happens to the best of us. You spend a Sunday afternoon fitting your rail, hang your curtains, stand back proudly — and three days later it’s on the floor. Here’s what went wrong and how to fix it.
Common Causes and Solutions
- Wrong wall plugs: The most common culprit. Plasterboard requires specialist anchors (Rawlplug or Fischer are reliable UK brands). Standard plastic plugs simply don’t grip in hollow walls.
- Too few brackets: Especially on bends, brackets need to be closer together. Aim for one every 15–20cm on curved sections.
- Track weight too heavy for the fitting: If you’ve got very heavy interlined curtains, a lightweight plastic flexible track won’t cope. Upgrade to aluminium or consider made-to-measure.
- Holes drilled in mortar joints: Mortar crumbles over time. Re-drill into the brick itself if possible.
- Cheap plastic gliders worn out: These can be replaced individually — you don’t need a whole new track. Order compatible gliders from the original manufacturer.
Quick test: Tug the track firmly once it’s fitted. If you can move it with moderate hand pressure, it’s not secure enough for heavy curtains.
Functionality is important, but let’s be honest — you also want it to look good. Here’s a quick guide to matching your curtain rail to your interior style.
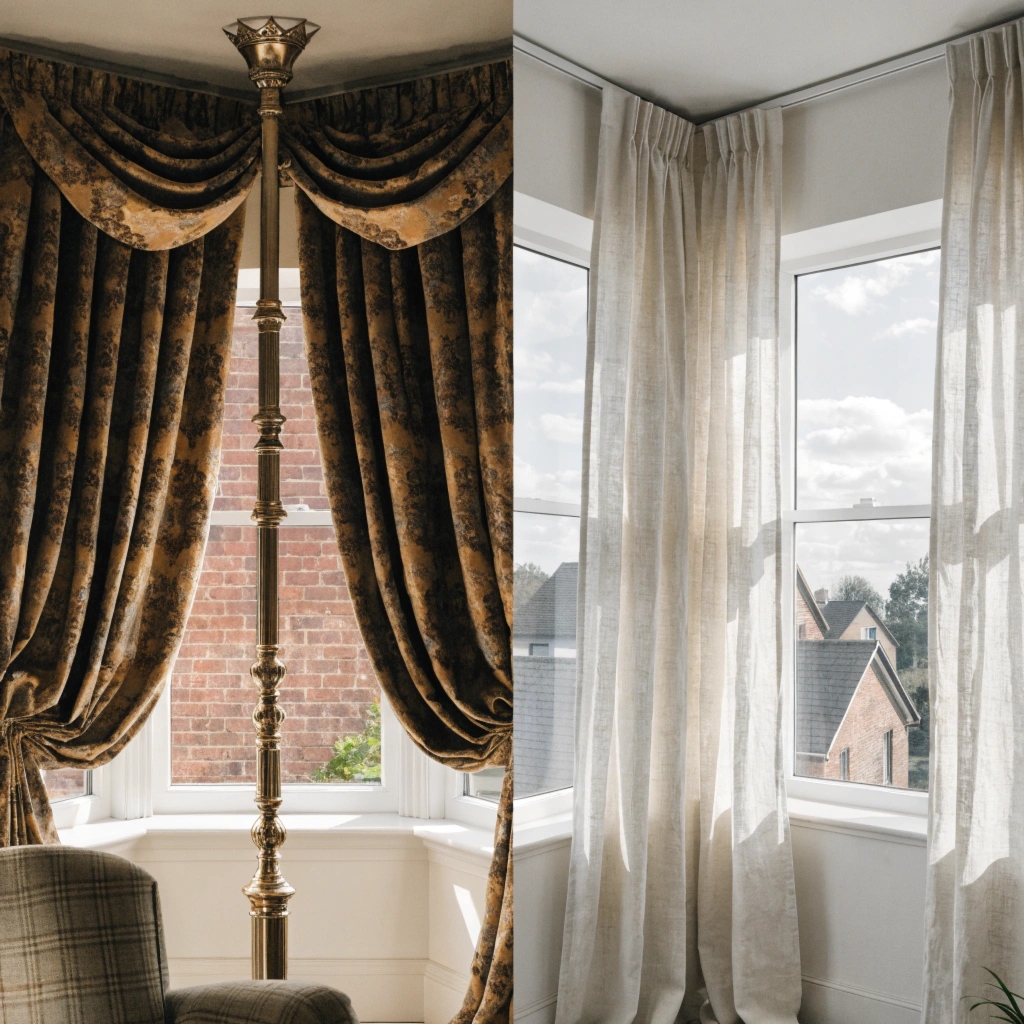
- Victorian / Edwardian terraced house: Warm metal finishes — brass, antique brass, or bronze — suit period properties beautifully. A decorative bay pole with ornate finials will complement the architecture rather than fighting it.
- Modern or minimalist home: Chrome, brushed nickel, or matte black. A ceiling-fixed track creates that sleek, hotel-style finish. Less is more.
- Cottagecore / traditional: Wooden bay poles in oak or walnut. Warm and organic. Works brilliantly in country homes or rooms with exposed beams.
- Contemporary rental or starter home: Stick to a clean white or silver flexible track. Affordable, easy to fit, inoffensive to future tenants or buyers.
One underrated tip: match your curtain rail finish to your door handles and light fittings. It ties the room together in a way that feels considered without being obvious about it.
| Question | Answer |
|---|---|
|
How do I fit a curtain rail in a bay window? |
Measure the full perimeter of your bay (not just across). Choose a flexible track or bay pole kit. Mark bracket positions at least every 30cm. Fix wall plugs and brackets, then slot the bent rail in. See the step-by-step guide above. |
|
How do I fix bay window curtain rails that keep falling? |
Usually a bracket problem. Use wall plugs rated for your wall type (plasterboard needs specialist anchors). Space brackets no more than 30–40cm apart on bends. For heavy curtains, go to ceiling fixing. |
|
How do I put up a bay window curtain rail myself? |
You need: a flexible track or bay pole kit, a drill, wall plugs, spirit level, tape measure, pencil. Allow 2–3 hours for a standard 3-sided bay. Full steps are covered above. |
|
Curtain rail vs curtain pole — which is better for bay windows? |
Rails (tracks) are better for curved bays. Poles suit angled bays with corner joints. Rails give smoother operation; poles look more decorative. |
|
Can I fit a bay window curtain rail to the ceiling? |
Yes — and it often looks better! You need at least a 7cm gap from the wall for smooth operation. Most tracks support both wall and ceiling fixing. |
Here are the best places to shop, depending on your budget and needs.
Budget (Under £50)
- Amazon UK— Wide range of flexible tracks, fast delivery. Look for tracks with 100+ reviews and an aluminium construction for better durability.
- Argos— Good for very basic flexible plastic tracks. Better for box bays than complex curves.
Mid-Range (£50–£150)
- Dunelm— Reliable mid-range options, good customer service, often have bay-specific poles in store.
- Poles & Blinds— Excellent specialist range of bay pole kits. Staff are knowledgeable. Good Awin affiliate programme.
- Curtain Pole Store— Great range of bendable tracks with helpful measurement guides.
Premium / Made-to-Measure (£150+)
- Direct Fabrics— Made-to-measure bay tracks bent to your exact specifications. Excellent for complex bay shapes.
- Ezecurtains— UK-only specialist. The team will help you measure correctly. Worth the investment for a permanent home.
- John Lewis — For premium motorised tracks and a brand name that converts well for higher-income buyers.
Bay window curtain rails shouldn’t be this complicated — but once you know your bay shape and understand the different track types, it all clicks into place. The short version:
- Curved or box bay + DIY budget: flexible aluminium bendable track, fitted to wall or ceiling.
- Angled Victorian/Edwardian bay + eyelet curtains: modular bay pole kit.
- Complex shape or heavy curtains: made-to-measure track from Direct Fabrics or Ezecurtains.
- Tech lover or hard-to-reach window: motorised electric track.
Measure around the bay, not across it. Use the right wall plugs for your wall type. And give yourself the afternoon — it’s not a 20-minute job, but it is absolutely a doable one.
If this guide saved you a wasted trip to B&Q, share it with someone else who’s staring at their bay window wondering what on earth to buy. And if you have questions, drop them in the comments — I’m happy to help.