
Bay windows are architectural showstoppers — but dressing them properly is one of the trickiest challenges in home décor. A flexible curtain rail for bay windows solves this problem elegantly, bending to follow your window’s exact angles without the need for costly custom joinery or awkward corner brackets.
Unlike standard straight rails, bendable tracks conform to virtually any bay shape, creating a seamless, polished look that rigid systems simply can’t match. Before diving into installation techniques and product selection, it helps to understand exactly what makes bay windows such a unique — and rewarding — decorating challenge.

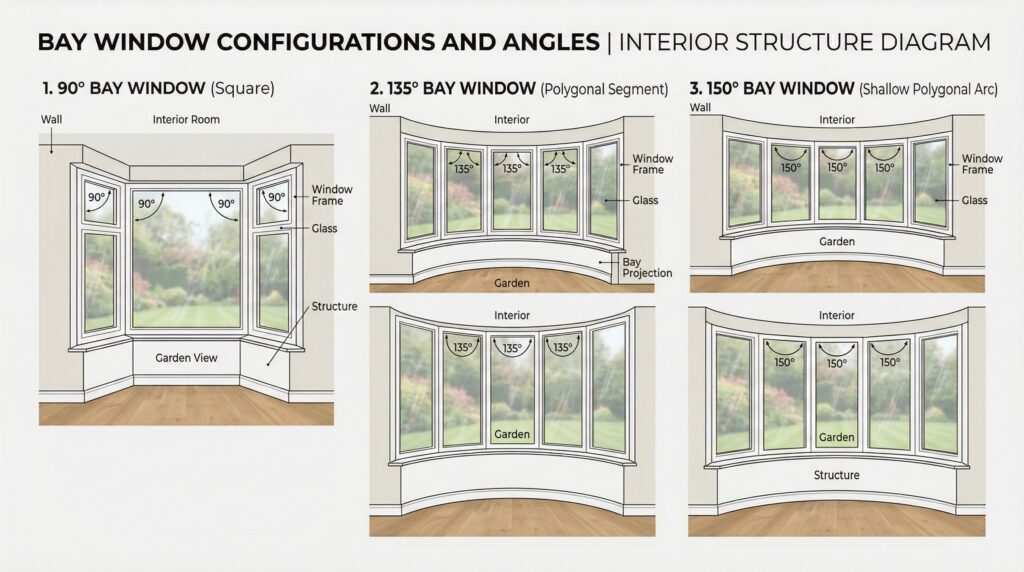
Bay windows project outward from a home’s exterior wall, creating a recessed alcove inside — and that distinctive shape is exactly what makes curtain hanging so tricky. Unlike flat walls where a standard straight rail slides right in, bay windows typically feature three or more angled panels joined at specific angles (most commonly 90°, 135°, or 150°).
That geometry creates a real problem. A rigid curtain pole simply can’t follow those bends. In practice, homeowners either end up with awkward gaps at the corners, mismatched panels on each section, or expensive custom-fabricated tracks.
A flexible curtain track for bay windows solves this directly. By conforming to any angle, it keeps your window treatment seamless from one end to the other — no visible breaks, no frustrated workarounds.
Other challenges worth recognizing:
I] Depth variation — bay window recesses differ in depth, affecting how tracks must be mounted
II] Weight distribution — long continuous tracks carry more fabric, requiring sturdy fixings
III] Light control — corners are natural weak points where light bleeds through if coverage isn’t complete
Understanding these structural quirks upfront saves considerable time and money. Once you’re clear on what your specific bay presents, choosing the right track becomes a much simpler decision — which is exactly where we’ll head next.
Not all bendable curtain track bay window solutions are created equal. Understanding the main types helps you match the right product to your specific window shape and curtain style.
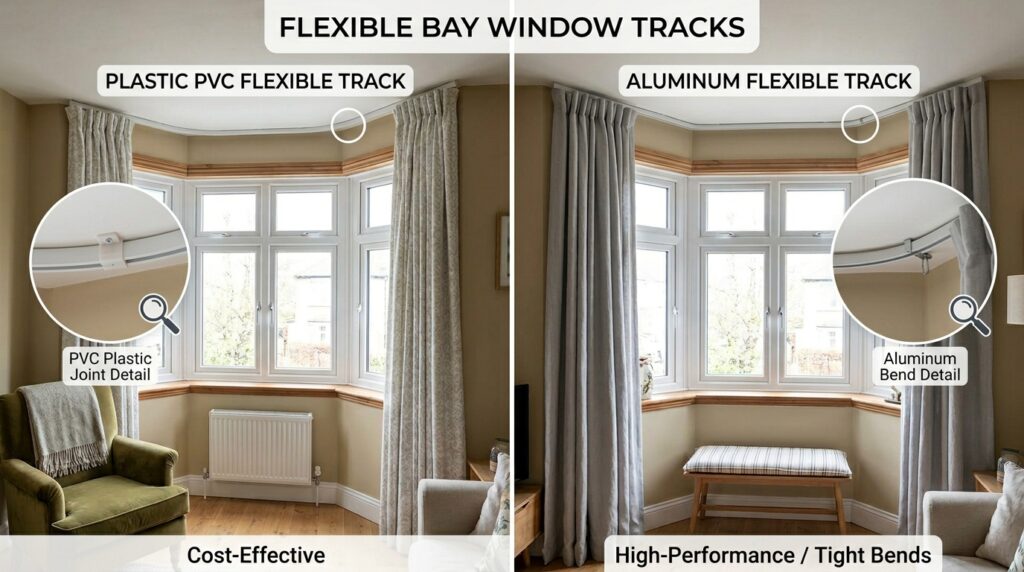
1] Flexible plastic track – Lightweight and budget-friendly, this bends easily by hand to follow gentle curves and angled bays.
2] Aluminum bendable track – More durable and suitable for heavier fabrics; requires a little more effort to shape but holds its form reliably.
3] Ceiling-mounted flexible track – Ideal when wall fixing isn’t practical; these ceiling track kits create a clean, contemporary look.
4] Valance-compatible flexible rail – Combines a curtain track with a valance channel, keeping your bay widow looking polished from every angle.
A versatile bend
able track is one of the few window solutions that adapts to your home — not the other way around. Once you know which type suits your bay, choosing the right one becomes considerably more straightforward.e
“Shop top-rated flexible curtain tracks with smooth gliders on Amazon UK (Amazon Associates) to ensure long-term durability
Selecting the right bay window curtain rail comes down to four practical factors: window geometry, curtain weight, mounting preference, and budget.
Key considerations at a glance:
1] Angle and span — Measure each facet carefully; tighter angles (under 120°) demand a more flexible track material
2] Curtain weight — Heavier fabrics like velvet require heavy-duty gliders and robust track profiles
3] Mounting style — Ceiling-mounted tracks, like the Velin Bendable Single Ceiling Curtain Track, create a dramatic, floor-to-ceiling effect; wall-mounted options suit standard ceiling heights
4] Cord or hand-draw— Pull-cord systems add everyday convenience, particularly across wide bay spans
A common pattern is to prioritize smooth glider action over price — a track that sticks or droops undermines even the most beautiful curtains. Once you’ve matched these criteria to your window, installation becomes far more straightforward — which is exactly what the next section walks you through.
Installing a flexible curtain rail for your bay window is genuinely manageable as a DIY project—provided you follow a logical sequence. Rushing the process is where most installations go wrong.
Here’s a streamlined overview of what the full process involves:
- Measureyour bay window accurately
- Shapethe track to match your window’s angle
- Mark and drillbracket positions
- Secure bracketsto wall or ceiling
- Snap the trackinto place and add gliders
- Hang and testyour curtains
For a visual walkthrough of the complete process, this bay window curtain track installation guide breaks each stage down clearly.
A reliable installation starts with precise measurement—everything downstream depends on getting that first step right. With your approach and product type already chosen from the earlier sections, you’re well-positioned to begin. Next up: exactly how to measure your bay window for a perfect fit.
Step 1: Measure Your Bay Window
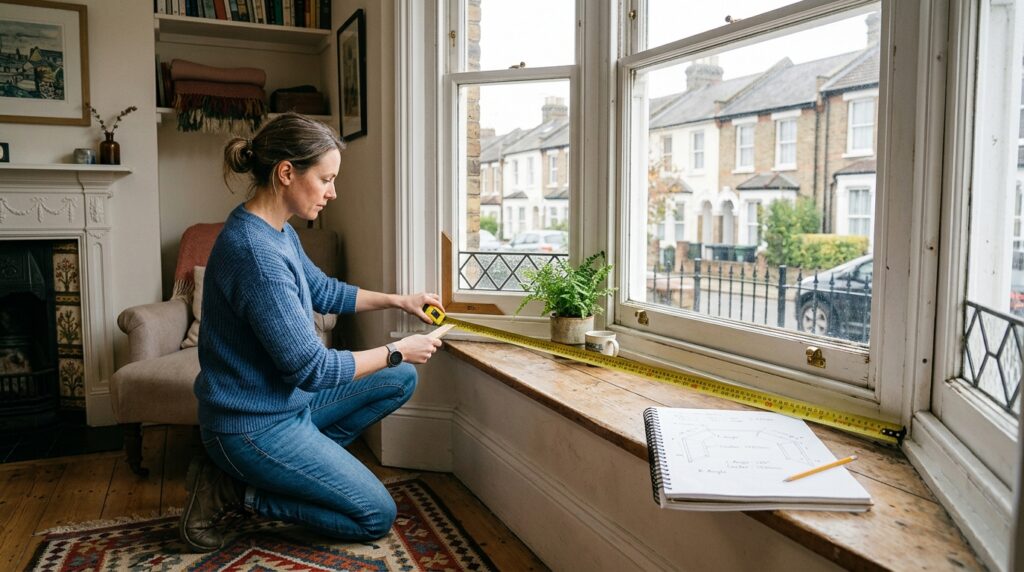
Accurate measurements are the foundation of any successful flexible curtain rail for bay window installation. Rushed or imprecise measuring is the most common reason projects go wrong—so take your time here.
What to measure:
- The width of each individual wall section within the bay
- The angle at each corner junction
- The total track length you’ll need (add all sections together)
- Your preferred mounting height above the window frame
Use a steel tape measure for accuracy, and always double-check each figure. Note the angles carefully—most bay windows sit between 90° and 135° per corner. Getting these numbers right makes the next step—bending the track to fit—straightforward rather than frustrating.
Step 2: Bend the Curtain Track to Fit
With your measurements in hand, it’s time to shape the track. This is where flexible curtain rails for bay windows truly earn their reputation—most quality tracks can be bent by hand without any specialist tools.
Work slowly and methodically:
- Mark your angle pointson the track using your measurements
- Apply gradual, even pressureat each marked point—avoid sharp, sudden bends
- Test-fit against the windowregularly to check alignment
A common pattern is to bend in small increments, stepping back frequently to compare the track’s curve against your window’s actual angles. Forcing a tight bend in one motion risks creasing or weakening the track material.
Once the shape matches your window profile, you’re ready to move on to securing it in place.
Step 3: Install the Track
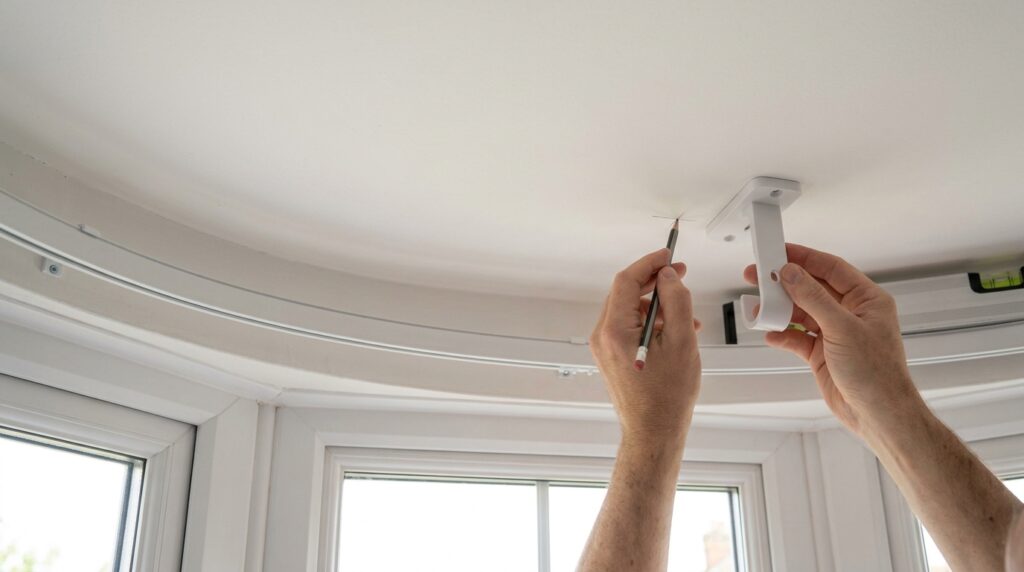
With your track shaped and ready, installation is straightforward—but a few details make the difference between a polished result and a frustrating redo.
Start by marking bracket positions along the wall or ceiling, spacing them every 12–15 inches for solid support. Pre-drill pilot holes to prevent cracking plaster, then secure each bracket firmly. Slide the shaped track into place, clicking it into the brackets as you work from one end to the other.
If you’re using a flexible curtain and valance rail system, install the valance carrier track first, then align the curtain track beneath it—both need level positioning for smooth operation. Check alignment as you go; a small adjustment now prevents stiff gliding later. A helpful visual walkthrough compares different installation approaches worth reviewing before you start.
Once secured, test every runner along the full track length. With the hardware in place, the next decision—choosing the right curtains—becomes the exciting part.
With your track installed, choosing the right curtains is the final piece of the puzzle. The good news: bay windows are versatile, and several styles work beautifully.
- Eyelet or ring-top curtainsglide smoothly along flexible rails and create a clean, contemporary look
- Pencil pleat curtainsoffer a more traditional, full appearance—ideal for period-style homes
- Sheer panelslayered under heavier drapes maximize light while maintaining privacy
For a truly seamless experience, pairing these styles with a flexible curtain rail with pull cord lets you open and close multiple panels effortlessly—no reaching into awkward corners. Heavier fabrics like velvet or linen reward this setup especially well.
The right curtain style amplifies your bay window’s best feature—its light-gathering curve—rather than fighting against it.
Even the perfect curtain choice can be undermined by avoidable installation errors, so let’s look at what to watch out for next.
Even with the right materials and a solid plan, a few easily avoidable errors trip up many DIYers. Knowing what they are upfront saves time, money, and frustration.
Rushing the bending process is the most common culprit. Applying too much force at once when shaping bendable curtain rails creates kinks that gliders won’t slide past smoothly. Work gradually, testing the curve against your window template frequently.
Other pitfalls to watch for:
1] Skipping bracket placement planning — spacing brackets too far apart causes the track to sag under curtain weight
2] Ignoring wall material — drywall anchors behave very differently from solid masonry fixings
3] Measuring only once — always double-check angles at each bay section before cutting
4] Overtightening screws — this can crack the track channel or strip anchor points
In practice, the overlap at corner joints is another overlooked detail. Leaving gaps causes curtains to snag mid-draw, undermining the whole setup.
A well-installed rail should glide effortlessly and sit flush against its planned curve — if either feels off, it’s worth pausing to diagnose before hanging curtains. Of course, even careful installation has boundaries, and understanding those limits will help you set realistic expectations for your finished window treatment.
Flexible curtain rails solve a lot of problems, but they’re not perfect for every situation. Being clear-eyed about their limitations helps you make the right choice upfront — rather than discovering the drawbacks after installation.
Weight capacity is the biggest constraint. A curved curtain track handles lightweight to medium-weight fabrics well, but heavy velvets or lined thermal curtains may cause sagging over time. Always check the manufacturer’s load rating before purchasing.
A few other practical considerations worth noting:
1] Very sharp angles (under 90°) can be difficult to bend cleanly without kinking
2] Long unsupported spans may require additional ceiling brackets for stability
3] Pull-cord systems add convenience but increase the complexity of setup
In practice, flexible rails work beautifully for standard bay window configurations. However, unusually deep or architecturally complex bays may benefit from custom-cut alternatives instead. These trade-offs are worth weighing carefully — and the key takeaways ahead will help you bring everything together into a clear, confident decision.
Flexible curtain rails offer a practical, cost-effective solution for bay windows that rigid tracks simply can’t match. Here’s what to keep in mind before moving forward:
- Measure carefully— accurate bay window dimensions are everything
- Match track weight capacityto your curtain fabric
- Wall condition and ceiling heightinfluence whether a wall-mounted or ceiling-mounted system works best
- Avoid common pitfallslike skipping pilot holes or under-ordering track length
Choosing the best curtain rail for bay window setups ultimately depends on your specific bay shape, curtain weight, and whether you need a pull cord system. With the right information, the decision becomes much clearer — which is exactly what the next section covers in detail.
With the limitations and key takeaways fresh in mind, it’s worth addressing the question most people start with: what’s actually the best curtain rail for a bay window?
The honest answer depends on your window’s angle and your budget. However, flexible curtain rails consistently stand out as the most versatile option. They bend to fit virtually any bay configuration without custom fabrication costs, making them the practical frontrunner for most homeowners.
In practice, look for a track that combines smooth gliding runners, durable construction, and ceiling or wall-mount compatibility. How you hang your curtains on that track matters just as much as the track itself — which is exactly what we’ll cover next.
Getting the installation right makes all the difference. The best approach depends on your bay window’s shape, but a few consistent principles apply.
Start with a continuous flexible track that follows the full perimeter of the bay. This creates a seamless look rather than awkward gaps at the angles. Mount brackets at regular intervals — typically every 12 inches — to prevent sagging, especially with heavier fabrics.
Key installation steps:
1] Mark bracket positions along the entire bay
2] Bend your flexible rail gradually to match the angles
3] Secure brackets before threading curtain hooks or gliders
4] Test movement across the full track length before final tightening
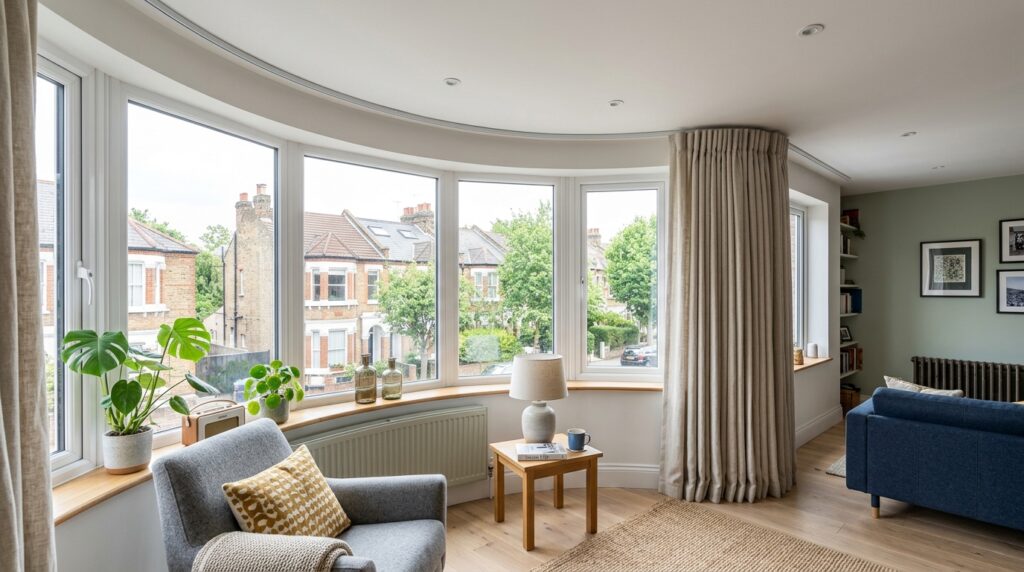
One practical approach is ceiling mounting rather than wall mounting, which maintains a clean sightline and maximizes the perceived height of the room.
Whether you’re working with a pull cord system or manual operation, smooth glider performance is what separates a frustrating setup from one that works effortlessly — which raises an important question about flexible tracks overall.
Yes — when chosen well and installed correctly. Flexible curtain tracks have earned a solid reputation for bay window applications because they solve a genuinely tricky problem without requiring expensive custom fabrication.
In practice, the main advantages are adaptability, cost-effectiveness, and ease of installation. A quality bendable track conforms precisely to your bay’s angles, glides smoothly, and handles everyday use reliably. The trade-off is that cheaper versions can feel flimsy or develop tracking issues over time.
The verdict hinges on quality. A well-made flexible track from a reputable supplier delivers performance that rivals rigid systems — and that’s worth paying a little more for. If you’re curious about exactly how the bending process works to achieve that perfect fit, that’s the natural next step to explore.
Bending a flexible curtain track is simpler than most people expect. Here’s a straightforward process:
Measure each angle of your bay window carefully before starting
Mark the bend points directly on the track using a pencil
Apply gradual, even pressure at each marked point — never force a sharp bend
Check the curve against your window frame as you go
Smooth, incremental bends produce far better results than attempting one dramatic angle adjustment. Work slowly, test frequently, and the track will follow your bay window’s geometry naturally — setting you up perfectly for a clean, professional installation.
Once your flexible curtain rail is properly bent and fitted, hanging the curtains correctly makes all the difference. The approach you choose depends on the look you’re after.
Two main hanging styles work well for bay windows:
1] Continuous coverage — one long curtain run following the track around the full bay, giving a seamless, unified appearance
2] Individual drops — separate curtain panels per window section, offering a more structured, traditional look
In practice, continuous coverage tends to maximize light control and insulation. Whichever style you choose, use eyelet or pencil pleat headings for smooth gliding along a flexible track.
The curtain style itself matters just as much as the hanging method — and that’s exactly what we’ll explore next.

Choosing the right curtains completes the picture. Lightweight fabrics like linen, voile, or cotton move smoothly along a flexible curtain rail for bay windows without snagging or pulling. Heavier velvets work beautifully too — just ensure your track has adequate weight capacity.
Eyelet curtains suit straight runs, while pencil pleat or tab-top styles are better suited to curved tracks, allowing smooth, even gliding around bends.
- Match fabric weight to your track’s load rating
- Choose floor-length panelsto maximize the sense of height and drama
- Use sheer underlayersfor privacy without sacrificing natural light
A flexible curtain rail, paired with the right fabric and hanging style, transforms a bay window from an architectural feature into a genuine focal point. Measure carefully, bend confidently, and choose curtains that complement both the track and your room’s aesthetic — and you’ll achieve results that look professionally installed every time.
This article may contain affiliate links. If you purchase through these links, we may earn a small commission at no extra cost to you. We only recommend products that are suitable for bay window curtain setups and trusted by UK homeowners.