

A ceiling fix curtain pole transforms how window treatments are mounted, offering a sleek, architectural alternative to traditional wall-bracket installations. Whether you’re dressing a floor-to-ceiling window, navigating an awkward bay window recess, or simply working with walls too unstable to support standard fixings, ceiling-mounted poles solve problems that conventional hardware cannot.
This approach is more common than many homeowners realize. Ceiling-mounted curtain systems appear across both residential and commercial interiors, prized for their clean sightlines and flexible positioning. They work equally well with lightweight sheers and heavier blackout fabrics.
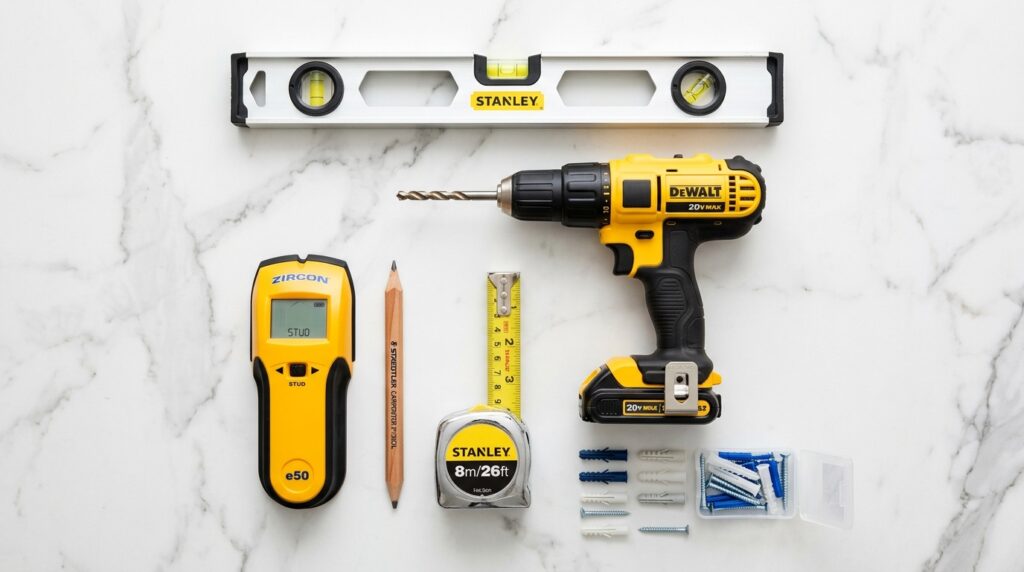
Before picking up a drill, however, success depends entirely on preparation — the right tools, the right fixings, and a clear understanding of your ceiling’s structure.
Before mounting a ceiling curtain pole, gathering the right materials and assessing your ceiling type are essential first steps. Rushing past this stage is one of the most common reasons installations fail or require costly rework.
Key prerequisites include:
1] Ceiling material identification — solid concrete, timber joists, or plasterboard each require different fixings. As noted in MyBuilder community guidance, plasterboard ceilings demand specialist cavity anchors rather than standard screws.
2] Stud finder or joist detector — locating structural support points is non-negotiable for load-bearing security.
3] Appropriate drill bits — masonry, wood, or multipurpose, matched to your ceiling composition.
4] Spirit level — ensures brackets align horizontally for a professional finish.
5] Measuring tape and pencil — precise bracket spacing prevents saggingpoles.
Acknowledging these requirements upfront saves significant time. With materials assembled and your ceiling properly assessed, the actual installation process becomes considerably more straightforward — which the step-by-step guide ahead covers in full detail.
Installing a ceiling curtain track successfully depends on following a logical sequence — one that avoids the common pitfalls of misaligned brackets or inadequate fixings. The process naturally divides into five core phases: measuring and marking, drilling and anchoring, mounting the track or pole, threading the hardware, and final adjustment.
Each phase builds directly on the preparatory work covered earlier, particularly ceiling type identification and material selection. Skipping steps — especially the verification checkpoints — is where most installation problems originate. A helpful visual reference demonstrates how bracket spacing and pilot hole accuracy directly affect the finished result.
With the full sequence clearly in mind, precise measurement forms the critical foundation — which is exactly where the installation begins.
Step 1: Measure and Mark the Installation Points
Accurate measurement is the foundation of a successful ceiling fix curtain pole installation. Before drilling a single hole, establish the precise bracket positions across the ceiling.
Key measurement steps:
I] Determine the drop distance from ceiling to desired curtain hem, then subtract pole diameter
II] Mark the pole’s start and end points, ensuring equal overhang on each side of the window
III] Use a chalk line or laser level to connect bracket positions in a perfectly straight run
For ceiling fix curtain poles, brackets typically space no more than 30–40 inches apart to prevent sagging under curtain weight. Double-check every mark with a spirit level before proceeding — even a two-millimeter deviation compounds across multiple brackets, creating a visibly uneven hang. With all positions confirmed and marked clearly, you’re ready to move on to securing the brackets themselves.
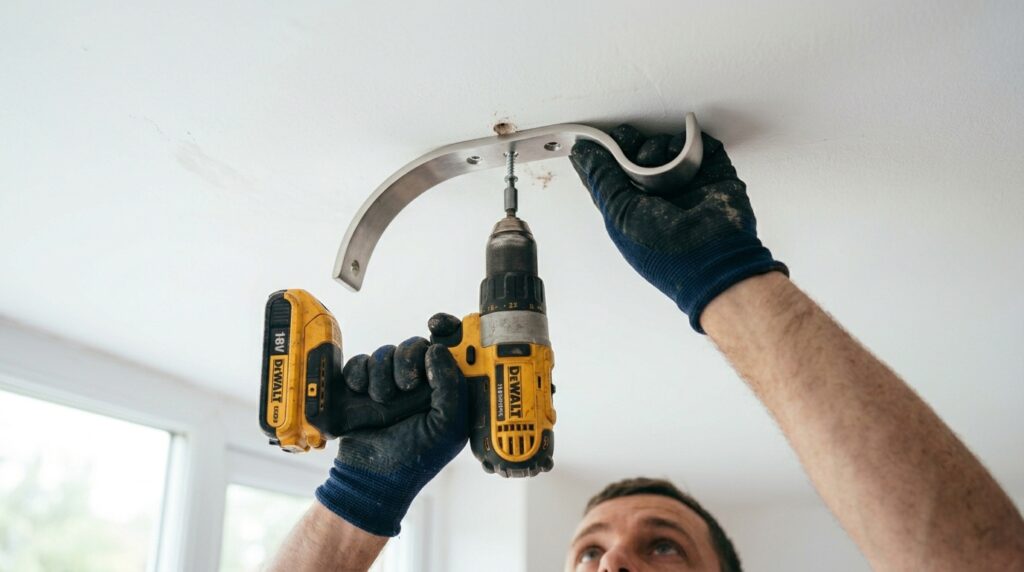
Step 2: Secure the Brackets to the Ceiling
With your marks clearly established, the critical phase of any curtain pole ceiling fix begins: anchoring the brackets securely overhead. This step determines the entire installation’s structural integrity.
Identify what’s above the ceiling surface first. Plasterboard ceilings require wall anchors or toggle bolts rated for overhead loads — standard screws will pull free under the weight of heavy curtains. Where joists are accessible, driving screws directly into timber provides a significantly more reliable fixing.
Bracket installation sequence:
I] Pre-drill pilot holes at each marked point
II] Insert appropriate anchors for your ceiling type
III] Position each bracket and fasten firmly, checking alignment
A ceiling mount curtain rod should feel completely immovable once brackets are seated — any wobble signals an inadequate fixing. Once every bracket is confirmed stable, you’re ready to attach the pole itself.
Step 3: Attach the Curtain Pole
With brackets firmly anchored overhead, threading and securing the ceiling mount curtain rod itself is the final mechanical step. Slide the pole’s rings or carriers onto the rod before inserting it into the brackets — a detail that’s easy to overlook until it’s too late. Options range from traditional pole-and-ring systems to track-based configurations available at major retailers, each offering different glide mechanisms suited to varying curtain weights.
Once rings are loaded, seat the pole into each bracket and tighten the retaining screws or locking collars firmly. Give the assembled rod a gentle lateral tug to confirm it doesn’t shift. A secure ceiling fix curtain pole should feel completely rigid — any wobble signals that bracket screws need further tightening or repositioning.
In practice, finials are added last, locking everything in place aesthetically and mechanically. This straightforward sequence applies equally to standard rectangular rooms; however, angled or multi-wall configurations introduce additional complexity — particularly relevant if you’re working around a bay window.

Bay windows introduce a distinct challenge that flat-wall installations simply don’t encounter. A bay window curtain pole ceiling fix must navigate two or three angled wall planes while maintaining visual continuity — a requirement that standard straight poles cannot meet.
In practice, the most effective solution is a flexible or jointed ceiling-mounted track that bends to follow the bay’s geometry. Systems like those available through IKEA’s track range or Home Depot’s ceiling-mount selection offer continuous tracks that curve around corners without requiring separate brackets at each angle.
Key planning considerations include:
Mapping each wall section’s angle accurately before purchasing track
Ensuring ceiling joists or a batten board span all three sides for secure anchoring
Allowing additional track length for the return sections at each end
The hardware and pole type you ultimately select will significantly shape the installation approach — which makes understanding the full range of available systems an essential next step.
Choosing the right hardware is just as important as the installation technique itself. Ceiling curtain rods and tracks fall into two broad categories, each suited to different functional and aesthetic goals.
Rigid poles — typically metal or wood — offer a classic, decorative look. They work well in standard rooms where a single straight run is sufficient. Flexible or modular tracks, by contrast, bend around corners and span multiple angles, making them the preferred choice for bay windows and room dividers.
| Type | Best For | Key Limitation |
|---|---|---|
|
Rigid Pole |
Flat walls, focal windows |
Cannot curve |
|
Aluminium Track |
Bay windows, long spans |
Less decorative |
|
Corded track |
Frequent, smooth operation |
Higher cost |
Corded track systems add a practical layer — smooth, consistent curtain movement without handling the fabric directly. Understanding these distinctions before purchasing prevents costly missteps that are surprisingly easy to make during installation.
Even well-planned installations can go wrong without proper awareness of the pitfalls. Skipping a stud finder is perhaps the single most costly error — brackets anchored into plasterboard alone will fail under the weight of heavy drapes, often pulling chunks of ceiling with them.
A common pattern is underestimating bracket spacing. Spans exceeding 120cm without intermediate support cause poles to bow visibly over time. For a 3 sided bay window curtain pole ceiling fix, this mistake compounds across three planes, leaving curtains that sag at every corner join.
Other frequent errors include:
I] Misaligned brackets — always use a spirit level across all fixing points before drilling
II] Incorrect fixings for ceiling type — toggle bolts for plasterboard, wood screws into joists
III] Forgetting curtain weight capacity — heavier fabrics demand rated hardware throughout
Accurate measurement and appropriate fixings are non-negotiable foundations; everything else is refinement. These errors are entirely preventable with careful preparation. However, even correct installation techniques have inherent constraints worth understanding — which the next section addresses directly.
Before committing to a ceiling fix curtain pole installation, it’s worth understanding where this approach has genuine constraints. Ceiling mount curtain brackets perform exceptionally well in many scenarios, but no solution is universally ideal.
Structural access remains the most significant limitation. Plasterboard ceilings without accessible joists require toggle bolts or specialist anchors, which cap the load-bearing capacity considerably. Heavy interlined drapes or blackout curtains may exceed what these fixings can safely support over time.
Aesthetic trade-offs also deserve honest consideration. Ceiling-mounted hardware draws the eye upward — desirable in rooms with low ceilings, but potentially awkward in spaces with decorative cornicing or intricate plasterwork.
One practical caveat: rental properties often restrict permanent ceiling fixings entirely, making alternative solutions more appropriate regardless of preference.
These are the kinds of nuanced questions that come up repeatedly — and the next section addresses the most common ones directly.
Can you fix a curtain pole to the ceiling?
Yes. Ceiling fix curtain poles are widely available and designed specifically for overhead mounting. The key requirement is securing brackets into ceiling joists or using appropriate cavity anchors for plasterboard ceilings.
How to fix curtain pole to ceiling — what’s the essential process?
Mark joint positions, drill pilot holes, attach ceiling brackets at consistent intervals, then slot the pole or track into place. Always verify bracket alignment before final tightening.
Do curtain rods attach to the ceiling in bay windows?
Yes — flexible ceiling-mounted tracks are the preferred solution for three-sided bay windows, allowing continuous, uninterrupted curtain movement around corners.
What fixings work in a plasterboard ceiling?
Toggle bolts or specialist cavity anchors, as discussed in earlier sections, distribute load safely where joists aren’t accessible.
Structural access remains the most significant limitation. Plasterboard ceilings without accessible joists require toggle bolts or specialist anchors, which cap the load-bearing capacity considerably. Heavy interlined drapes or blackout curtains may exceed what these fixings can safely support over time.
Aesthetic trade-offs also deserve honest consideration. Ceiling-mounted hardware draws the eye upward — desirable in rooms with low ceilings, but potentially awkward in spaces with decorative cornicing or intricate plasterwork.
One practical caveat: rental properties often restrict permanent ceiling fixings entirely, making alternative solutions more appropriate regardless of preference.
These are the kinds of nuanced questions that come up repeatedly — and the next section addresses the most common ones directly.
Understanding how to install curtain rods on ceiling mounts comes down to a handful of principles that apply across most scenarios:
1] Ceiling type determines your fixing method — solid joists support direct screws; plasterboard requires cavity anchors or a batten
2] Track systems outperform poles in bay windows and curved layouts, offering smoother operation and cleaner aesthetics
3] Weight capacity matters — match your bracket specification to your fabric weight before purchasing
4] Bay window installations benefit most from ceiling mounting, eliminating the need for awkward angled wall brackets
5] Plumb and level checks at every stage prevent misalignment that compounds across multiple brackets
A well-planned ceiling fix curtain pole installation rewards preparation far more than installation speed. Getting the substrate right, spacing brackets correctly, and choosing a compatible pole-and-bracket system are the decisions that determine long-term success.
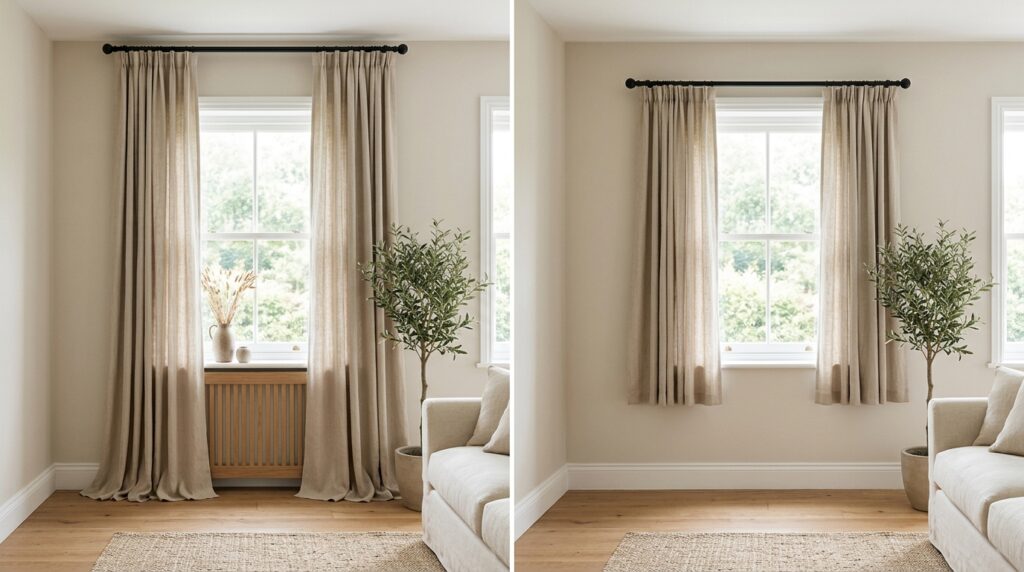
Placement height is one of the most consequential decisions when learning how to fix ceiling curtains effectively. The answer depends primarily on your goal: maximizing perceived ceiling height or achieving precise light control.
Ceiling-level mounting creates an unbroken vertical drop of fabric, making rooms feel taller and more dramatic. In practice, this works best in rooms with standard 8–9 ft ceilings where every inch of visual height matters.
Window-level mounting, by contrast, prioritizes functional coverage — keeping the curtain closer to the glazing reduces drafts and light bleed at the edges.
A practical rule: mount closer to the ceiling when aesthetics lead; mount closer to the window when thermal or blackout performance matters most. Bay windows add another layer of complexity to this decision — a topic the next section addresses in depth.
Mastering the ceiling fix curtain pole installation process transforms both practical function and interior aesthetics. Throughout this guide, the core principles remain consistent: identify your ceiling substrate, select appropriate fixings, measure precisely, and work systematically through each installation stage.
Ceiling-mounted curtain solutions excel where wall space is limited, where bay windows demand flexible track configurations, or where dramatic floor-to-ceiling draping is the design goal. In practice, the extra planning required pays dividends in a cleaner, more polished result.
Key takeaways to carry forward:
I] Always locate joists or use cavity fixings rated for your curtain weight
II} Flexible track systems solve bay window geometry far more elegantly than rigid poles
III] Placement height dramatically affects how spacious a room feels
The right installation isn’t simply functional — it redefines a room. Take the measurement stage seriously, invest in quality fixings, and the finished result will reflect that care for years to come.